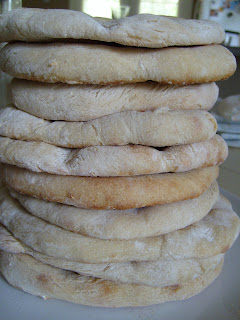
I've been wanting to try my hand at making homemade pita bread for a while now. Pita bread is so yummy, but it is really expensive in the stores (at least where I live). This is my first time making pita bread and I was really happy with how it turned out. It was really yummy! We used it for pita pocket sandwiches and for pita pizzas this week. Plus I tried some out warm with butter on it. All of these uses were a hit with us! So here is the pita bread recipe...which is from About.com.
Whole Wheat Pita Bread
2 1/2 cups warm water (110 degrees)
1 1/2 tsp. active dry yeast
1 T. honey
2 cups wheat flour
3 cups all purpose flour
1 tsp. salt
1 tsp. vegetable oil
Dissolve yeast in warm water. Add honey and stir until dissolved. Let sit for 10-15 minutes until water is frothy.
Combine white flour, wheat flour, and salt in large bowl. Make a small depression in the middle of flour and pour yeast water in depression. Stir with wooden spoon or rubber spatula until dough becomes elastic.
Place dough on floured surface and knead for 10-15 minutes. When the dough is no longer sticky and is smooth and elastic, it has been successfully kneaded.
Coat large bowl with vegetable oil and place dough in bowl. Turn dough upside down so all of the dough is coated with oil. Allow to sit, covered, in a warm place for about 3 hours, or until it has doubled in size. (Mine didn't take that long!)
Once doubled, roll out in a rope, and pinch off 10-12 small pieces. Place balls on floured surface. Let sit covered for 10 minutes. Preheat oven to 500 deg F. and make sure rack is at the very bottom of oven. Be sure to preheat your baking sheet also.
Roll out each ball of dough with a rolling pin into circles. Each should be about 5-6 inches across and 1/4 inch thick.
Bake each circle for 4 minutes until the bread puffs up. Turn over and bake for 2 minutes. Remove each pita with a spatula from the baking sheet and add additional pitas for baking. Take spatula and gently push down puff. Allow to cool before placing in storage bags.
My Notes
*I think next time I will switch the ratio of wheat/white flour so that it is more wheat than white. I didn't have a rolling pin so I just used my hands. I think a rolling pin would work better though. Also be sure not to get it too thin in any area or it will not puff up when you bake it and then will not separate right when you try to open the pocket.

Storing Pita Bread
Pita bread can be stored for up to a week in a pantry or bread box, and up to a month in the freezer. Be sure to use freezer bags when storing in the freezer. Pita bread dough can also be refrigerated for up to one week in the refrigerator.

3 comments:
Can´t belive you did this, my sister who was never into cooking! Wow! Looks so delicious! I too have been wanting to make some but haven´t due to no oven and no freezer space so when I come we will make up a batch. I can smell them cooking now, yummy!
THey do look yummy... can I try one when I get back???
Yea! These look so yummy Sarah! I am so proud of you for trying something new and learning how to manage your time and do this with three little ones - no small feat! :)
Love you sis,
Shannon
Post a Comment